Are you tired of simply watching birds from afar, and want to bring them closer to your home? Well, you’re in luck, because making your own bird feeder is a fun and easy way to attract beautiful feathered friends to your backyard! With just a few basic supplies and some simple steps, you can create a bird oasis that will delight both you and your new avian visitors.
In this blog, we’ll walk you through the process of making your very own bird feeder. We’ll cover everything from the supplies you need, to the different types of birdseed you can use, to tips for attracting a variety of birds to your feeder. We’ll also share some beautiful and creative designs that you can use as inspiration for your own feeder.
Whether you’re a seasoned DIY enthusiast or a beginner looking for a fun project, this blog has everything you need to know to create a beautiful bird feeder that will bring you joy and delight for years to come. So, grab your materials, put on your DIY hat, and get ready to create a beautiful bird oasis in your own backyard! Don’t forget to read to the end of this blog to get all the tips and tricks for making your own bird feeder.
10 Best DIY Bird Feeder: Simple Steps to Create Your Own Bird Oasis
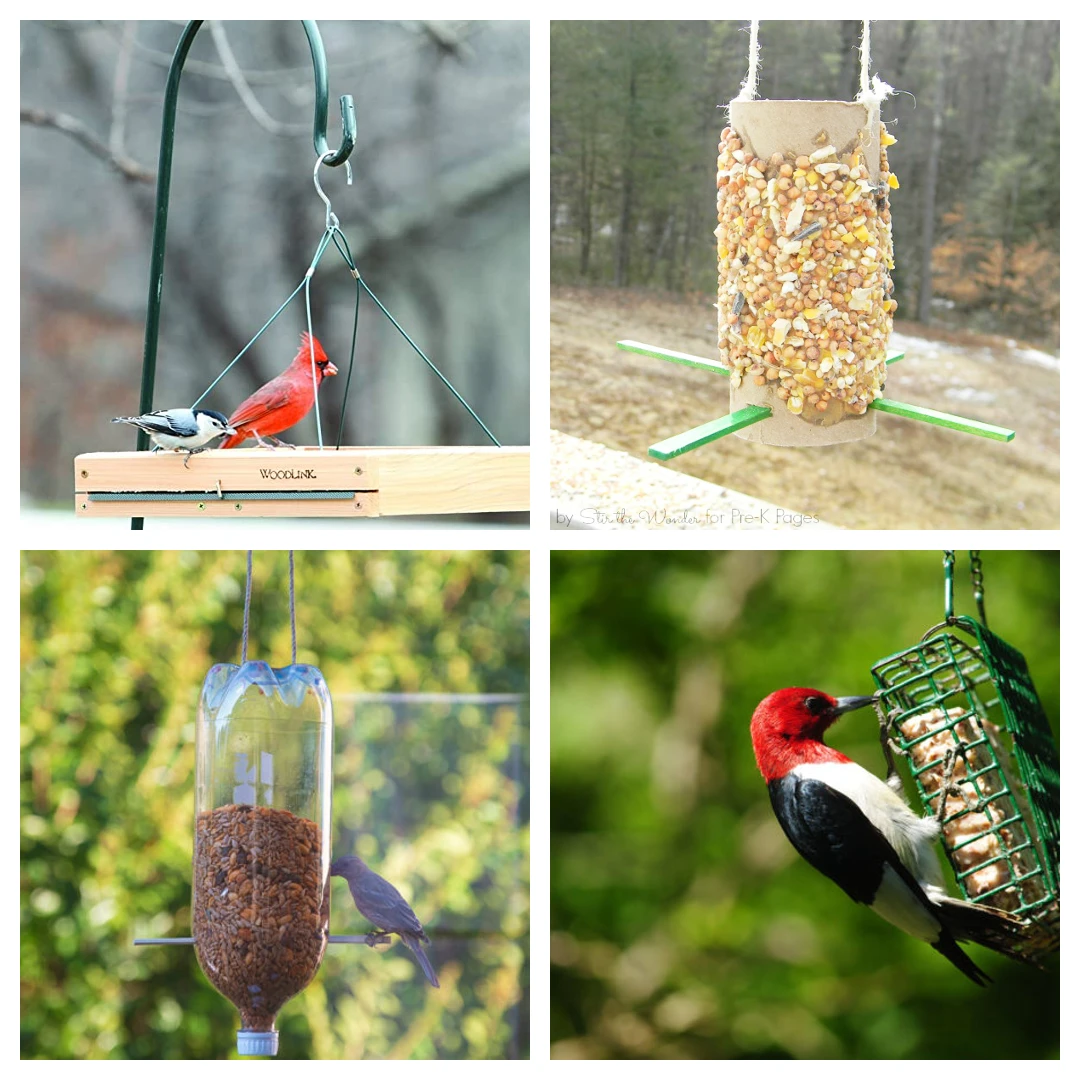
1. The Classic Platform Feeder
Before you start your project, you’ll need to gather the following materials:
Materials:
- Wooden dowel or branch (approximately 12-16 inches long and 1-2 inches in diameter)
- Hammer
- Nails
- Ruler or measuring tape
- Sandpaper
- Drill and 1/8 inch drill bit
- Screws
- Plastic or metal container (such as a yogurt or margarine tub)
- Twine or rope
- Birdseed
Steps:
The classic platform feeder is a simple and versatile design that can attract a wide variety of birds. This type of feeder is essentially a flat tray that can hold birdseed, and is often placed on a post or hung from a tree branch. The open design of the platform feeder makes it easy for birds of all sizes to land and feed, which can help attract a diverse range of feathered friends.
- Prepare the dowel or branch
Using sandpaper, smooth any rough spots or rough edges on your wooden dowel or branch. This will ensure that your bird feeder is safe for birds to use.
- Create the feeding platform
Using a drill and 1/8 inch drill bit, make two evenly spaced holes near the top of your dowel or branch, approximately 4-6 inches apart. These holes will be used to secure the feeding platform.
- Attach the container
Take your plastic or metal container and, using screws, attach it to the bottom of the dowel or branch, making sure to line up the holes with the holes in the dowel.
- Fill the container with birdseed
Fill your container with birdseed, making sure to leave enough room for the birds to access the seeds.
- Attach the hanger
Using twine or rope, create a loop and attach it to the top of your dowel or branch. This will be used to hang your bird feeder.
- Hang your bird feeder
Find a sturdy branch or hook on which to hang your bird feeder. Make sure that it is not too high, as this can make it difficult for birds to reach the food, but not too low, as this can make it vulnerable to predators.
2. The Peanut Butter Bird Feeder
Materials:
- Pinecone
- Peanut butter
- Birdseed
- Twine or rope
Instructions:
- Spread peanut butter on the pinecone, making sure to cover it thoroughly.
- Roll the peanut butter-covered pinecone in birdseed.
- Tie twine or rope around the top of the pinecone to create a hanger.
- Hang your feeder from a sturdy branch or hook.
3. The Recycled Bottle Feeder
Materials:
- Plastic bottle (2-liter or similar size)
- Ruler or measuring tape
- Scissors or utility knife
- Birdseed
- Twine or rope
Instructions:
- Cut the plastic bottle in half using scissors or a utility knife.
- Make two holes near the top of the bottle and thread twine or rope through the holes to create a hanger.
- Fill the bottom half of the bottle with birdseed.
- Place the top half of the bottle over the bottom half to create a cover.
- Hang your feeder from a sturdy branch or hook.
4. The Suet Feeder
Materials:
- Suet cake
- Wire mesh
- Wire cutters
- Twine or rope
Instructions:
- Cut a piece of wire mesh to fit the size of the suet cake.
- Place the suet cake on the wire mesh.
- Fold the wire mesh around the suet cake, making sure that it is secure.
- Tie twine or rope around the top of the wire mesh to create a hanger.
- Hang your feeder from a sturdy branch or hook.
5. The Mason Jar Feeder
Materials:
- Mason jar
- Twine or rope
- Birdseed
- Drill or hammer and nails
- Holesaw or large drill bit
Instructions:
- Drill or punch two holes near the top of the mason jar lid using a drill or hammer and nails.
- Thread twine or rope through the holes to create a hanger.
- Fill the mason jar with birdseed.
- Secure the lid onto the jar.
- Hang your feeder from a sturdy branch or hook.
6. The Milk Carton Feeder
Materials:
- Milk carton (1 liter or similar size)
- Ruler or measuring tape
- Scissors or utility knife
- Birdseed
- Twine or rope
Instructions:
- Cut two holes on opposite sides near the top of the milk carton using scissors or a utility knife.
- Thread twine or rope through the holes to create a hanger.
- Fill the carton with birdseed.
- Close the carton and hang it from a sturdy branch or hook.
7. The Coconut Shell Feeder
Materials:
- Coconut shell
- Drill or hammer and nails
- Holesaw or large drill bit
- Twine or rope
- Birdseed
Instructions:
- Drill or punch two holes near the top of the coconut shell using a drill or hammer and nails.
- Thread twine or rope through the holes to create a hanger.
- Fill the coconut shell with birdseed.
- Hang your feeder from a sturdy branch or hook.
8. The Apple Feeder
Materials:
- Apple
- Peanut butter
- Birdseed
- Twine or rope
Instructions:
- Spread peanut butter on the apple, making sure to cover it thoroughly.
- Roll the peanut butter-covered apple in birdseed.
- Tie twine or rope around the top of the apple to create a hanger.
- Hang your feeder from a sturdy branch or hook.
9. The Pop Bottle Feeder
Materials:
- Plastic pop bottle (2-liter or similar size)
- Ruler or measuring tape
- Scissors or utility knife
- Birdseed
- Twine or rope
Instructions:
- Cut the plastic pop bottle in half using scissors or a utility knife.
- Make two holes near the top of the bottle and thread twine or rope through the holes to create a hanger.
- Fill the bottom half of the bottle with birdseed.
- Place the top half of the bottle over the bottom half to create a cover.
- Hang your feeder from a sturdy branch or hook.
10. The Wine Bottle Feeder
Materials:
- Wine bottle (empty)
- Twine or rope
- Birdseed
- Drill or hammer and nails
- Holesaw or large drill bit
Instructions:
- Drill or punch two holes near the top of the wine bottle using a drill or hammer and nails.
- Thread twine or rope through the holes to create a hanger.
- Fill the wine bottle with birdseed.
- Hang your feeder from a sturdy branch or hook.
Conclusion:
Making your own bird feeder is a fun and rewarding project that can be easily customized to suit your own preferences and the needs of the birds in your area. Use the 10 designs outlined above as a starting point and let your creativity take over! Enjoy watching the birds in your backyard and learning about different species and their behavior.
Facts
- Bird feeders have been used for centuries to attract and feed birds. In fact, the first bird feeder was invented in the 19th century by a man named Eliot A. Norris.
- There are over 10,000 species of birds in the world, and many of them can be attracted to bird feeders. Some common backyard birds in North America include the American Goldfinch, Black-capped Chickadee, House Finch, and Northern Cardinal.
- Bird feeders can help birds survive during difficult times, such as winter when food sources are scarce. By providing a reliable source of food, bird feeders can help birds maintain their energy levels and survive the cold winter months.
- Different types of bird feeders are designed to attract different types of birds. For example, tube feeders are often used to attract small birds like finches, while platform feeders are more likely to attract larger birds like jays and doves.
- In addition to birdseed, bird feeders can also be stocked with other foods like suet, mealworms, and fruit to attract different types of birds.
- Bird feeders can also be a great way to observe birds up close and learn more about their behaviors and habits. Many bird watchers enjoy keeping a journal of the different birds they observe at their feeder over time.
FAQs
You will need some basic supplies such as wood, screws, drill, saw, sandpaper, and birdseed. The specific supplies you need may vary depending on the design of your bird feeder.
No, you don’t need to be an expert in woodworking to make a bird feeder. There are many easy-to-follow tutorials and guides available online that can help you create a bird feeder that is both functional and beautiful.
Attracting birds to your bird feeder can take some time and effort, but it’s definitely worth it. Some tips for attracting birds include placing your bird feeder in a visible location, using a variety of birdseed, and making sure your bird feeder is well-maintained.
The frequency with which you need to refill your bird feeder will depend on the size of your bird feeder, the number of birds visiting it, and the type of birdseed you are using. As a general rule, you should aim to refill your bird feeder every few days to ensure that there is always food available for your feathered friends.
Yes, it’s important to take certain precautions when making a bird feeder, particularly if you are using power tools or sharp objects. Always wear protective gear like gloves and eye goggles, and make sure to follow the instructions carefully. Additionally, make sure to choose a safe location for your bird feeder, away from areas where predators like cats or squirrels may be lurking.
Read More: